
This is an old revision of the document!
Laser Cutter
Yilong Ping Pong -lasercutter
- Cutting area 1300*900 mm
- Control board Smoothieboard V1
- Power 120W, laser tube replaced three times: 2015, 2020 and 2025.
The laser cutter is controlled by an application called Lightburn using G-code. If you are not already familiar with the application, here is a link to its documentation.
Materials
DO NOT USE MATERIALS THAT YOU AREN'T FAMILIAR WITH.
First identify the material, e.g. with a flame test or ask others for advice. Test new materials with caution (preferably with a more experienced user, also check the material safety data sheet (MSDS) first, if available).
- The best plywood for laser cutting is Koskisen flex-glued birch plywood, most easily available from A-Mekanisaatio Oy's service point in the hacklab next to the electronics workspace. https://www.mekanisaatio.fi/laservanerit. So-called furniture plywood, i.e. urea-glued interior, INT plywood also works in cutting, there may be challenges in availability. (urea-formaldehyde-based glue) plywood (EN 314-2, class 1, interior; e.g. UPM Wisa Interior). The laser cannot cut ordinary phenolic resin-glued (exterior, EXT) plywood: The beam cannot penetrate the glue, and mostly burns an ugly mark. In image engraving, the quality of the plywood is not important, only in cutting.
- PMMA Acrylic is the best plastic.
- List of materials. Red = not working/prohibited. Yellow = works with reservations. Green = tested to work.
Functional materials
| Material | Notes | Warnings |
|---|---|---|
| Wood | Thin wood material cuts nicely. All wood materials work well for engraving. | Wood can catch fire, especially resinous and oily woods. |
| Urea-glued plywood | (urea-formaldehyde-based glue) plywood (EN 314-2, class 1, interior; e.g. UPM Wisa Interior). Cuts and carves nicely. | Always check the type of plywood before cutting! |
| MDF/chipboard | The cutting edge is inevitably sooty. | The edges can char at higher powers. |
| Paper/cardboard | Cuts very well at low powers. | Can catch fire. |
| Cardboard | Cuts. Corrugated cardboard can also be cut on the top side, leaving the bottom intact. | Can catch fire, smokes. |
| Acrylic (Polymethyl methacrylate = PMMA, plexiglass) | The best laser plastic, the only material that vaporizes when cut. Cuts and engraves neatly. The cut edge has stresses due to heat, which can cause cracking when using instant glue. It is also possible to paint with acrylic paint and engrave the paint away, leaving a neat mark. Also available as a pre-coated sheet, which is good for making marks. | Let the vacuum cleaner remove the cutting fumes before opening the laser cover. |
| Delrin (polyacetal) | Cuts | Pay attention to the storage of sheets, they easily become warped and then lasering becomes difficult. |
| Kapton tape | Thin film cuts precisely. | |
| Fabrics, felt | Cuts depending on the material: Plastic fabrics can smoke and smoke, natural fibers can burn and not necessarily be cut. | Smokes/may burn. |
| Genuine leather | Smells really bad, but cuts and engraves decently. | Only genuine leather, artificial leather on the banned list. Smells really bad. |
| NON-CHLORINATED rubber | Cuts, but smells bad. | Beware of chlorinated materials. |
| Glass | Engraves jaggedly, can't cut through. | Engraving only! May crack. |
| Anodized aluminum, coated metals | Marks nicely, especially on dark surfaces leaves a good mark. | Engraving only! |
Prohibited materials
| Material | Danger | Explanation |
|---|---|---|
| PVC/vinyl/artificial leather | Produces chlorine gas! | All chlorinated materials release chlorine gas when burned. The gases are corrosive and oxidize the cutter parts to ruin. Irritating to breathing and eyes, can cause respiratory damage in larger quantities (World War I war gas). |
| ABS | Releases cyanide gases, melts. | Does not cut properly, melts and can catch fire. Releases cyanide gases and toxic smoke when burned, which are harmful to health. |
| SAN, styrene-acrylonitrile | Same ingredients as ABS. | |
| Polycarbonate (PC), Lexan | Cuts poorly, messes up the machine. | Absorbs laser radiation effectively, melts the surface. May catch fire. Produces yellow dust that messes up the machine lenses and mirrors. |
| HDPE and other highly flammable plastics | Melts and catches fire. | Dripping flaming molten droplets. |
| Polystyrene, polypropylene and other foamy plastics | Melts and catches fire. | High fire risk, melts easily and catches fire. |
| Carbon fiber, fiberglass | Will not cut, will smoke. | Produces bad fumes, and will not cut. |
| Metals | Will not cut. | Reflects infrared effectively so metals will not cut at all. |
| Phenolic resin plywood, “regular” plywood | Will not cut through, will burn. | Plywood with glue visible as dark streaks around the edges will not cut through. It will only catch fire and smoke. Do not cut! The surface will be engraved. |
These materials are prohibited for good reasons: They mess up the machine, irritate the eyes and respiratory system, and/or cause fires. Don't even try!
Lightburn has a built-in material test generator. For more information about this great tool, see the Lightburn documentation.
With Deepnest you can optimise the amount of material used. https://github.com/deepnest-io/Deepnest/releases
Use
Focus adjustment
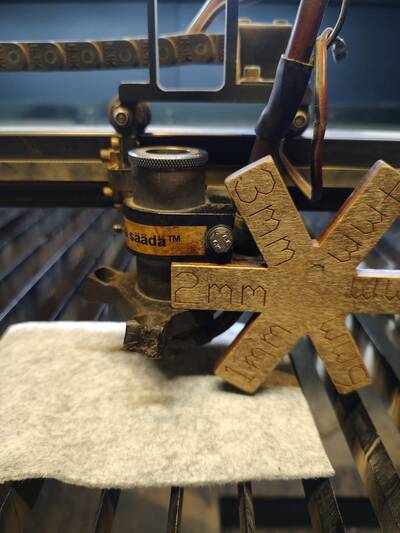
- Loosen the bolt shown in the picture
- Check the thickness of the piece to be cut, then place the focusing tool as shown in the picture
- Tighten the bolt
- Remove the focusing tool
If the thickness of your workpiece is not listed on the focusing tool, you’ll need to improvise.
Returning to home position
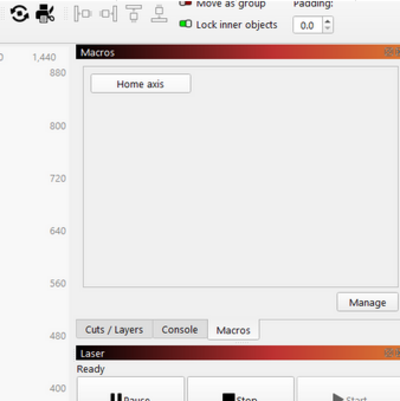
It is much easier to use the laser when its physical location is the same than what Lightburn shows. This can be done in Lightburn by clicking Home axis button found from Macros tab
After Use
When you’re finished, clean up after yourself. Turn off the laser if no one else is going to use it. Note that if you switch off the large laser’s cooler, the small laser will also shut down.
If any problems came up during use, report them in the lab’s communication channels (at the very least, write them in the logbook). Fill in the logbook (the grey notebook hanging next to the laser) with what you did, how long it took, what power settings you used, and how it turned out.
Check the other entries in the logbook for examples. This way, we can collect useful information that may benefit other members.
Laser maintenance
If you're not familiar with these, DO NOT TOUCH.
Cleaning of the bed
- Remove the aluminum profiles by lifting
- Place the aluminum profiles in a container that fits them (a fluorescent light dome works, a purpose-made container could also be good)
- Put a dishwasher tablet / powder in the container
- Add hot water
- Let it dissolve for a while. e.g. 15 min
- Rub the dirt off, e.g. first with a scrubbing sponge. Use protective gloves
- Rinse and dry the profiles
- Vacuum the inside of the machine
- Put the profiles back in place
Cleaning of mirrors and lenses
TODO: Kirjoita
Replacing mirrors & lenses
TODO: Kirjoita
Mirror alignment
Here is a pretty good guide https://github.com/nortd/lasersaur/wiki/Calibrating-mirrors-and-lenses